在辉光管时钟里,我们还加入了温度显示功能。这里,我们采用简单易用的温度芯片DS18B20来测量环境温度。DS18B20是常用的数字温度传感器,具有体积小,硬件开销低,抗干扰能力强,精度高的特点。
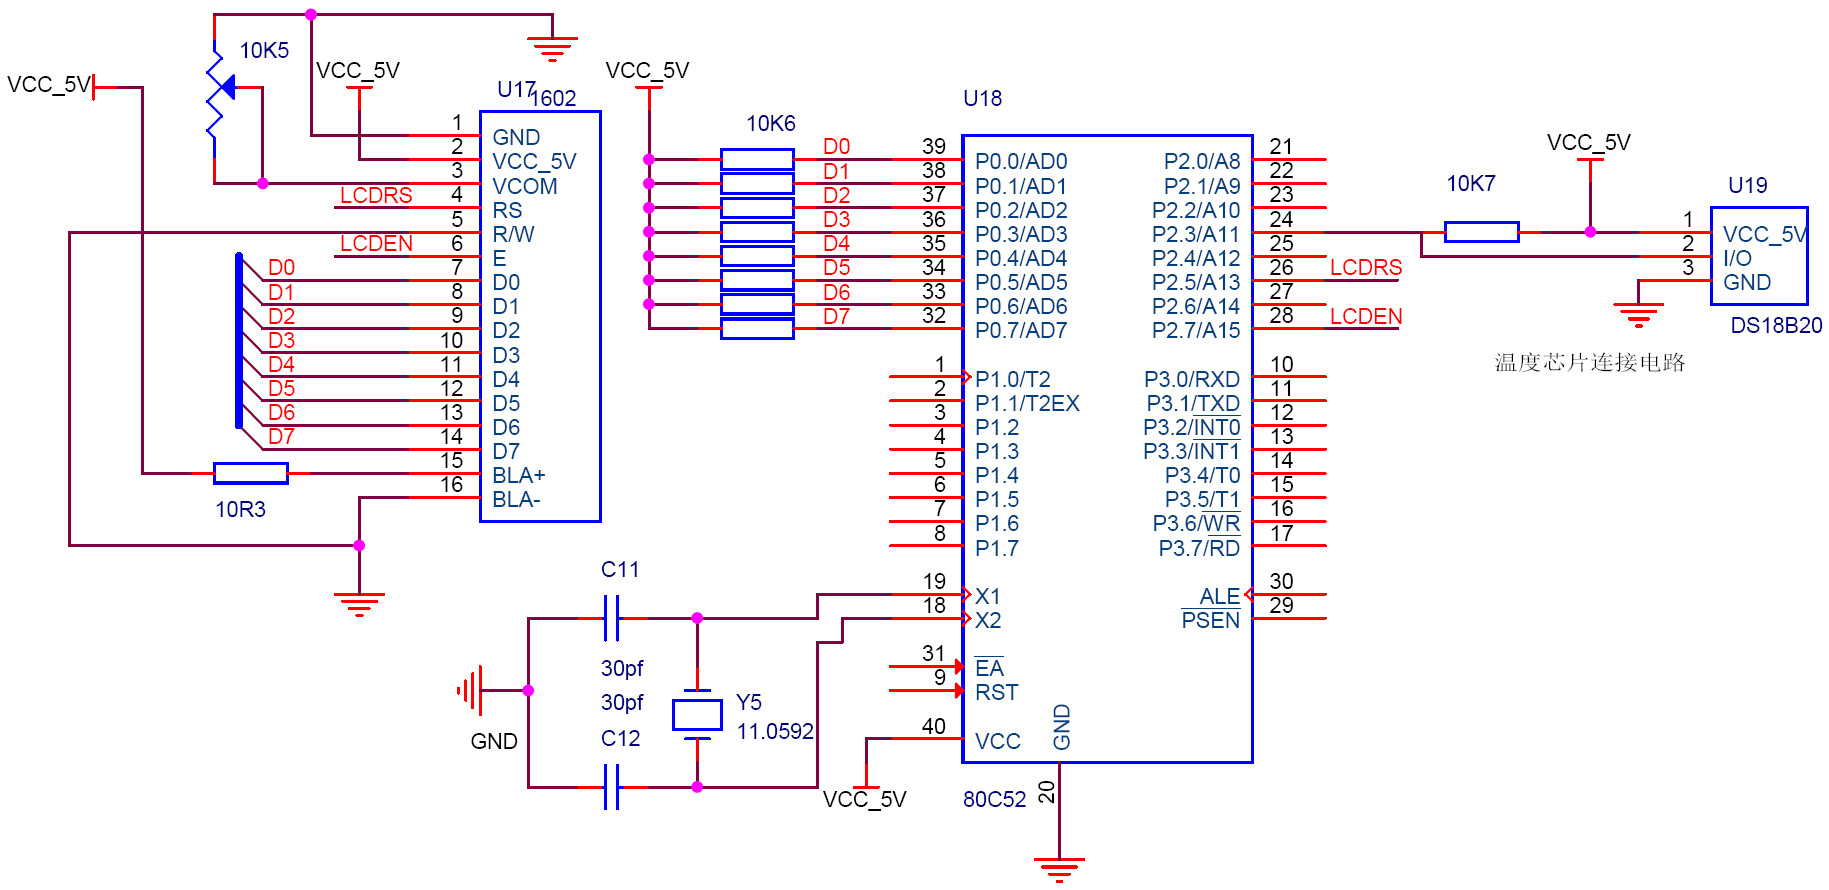
本文主要是通过STC89C52单片机与温度芯片DS18B20通信,让LCD1602来显示温度,其电路原理图如下:

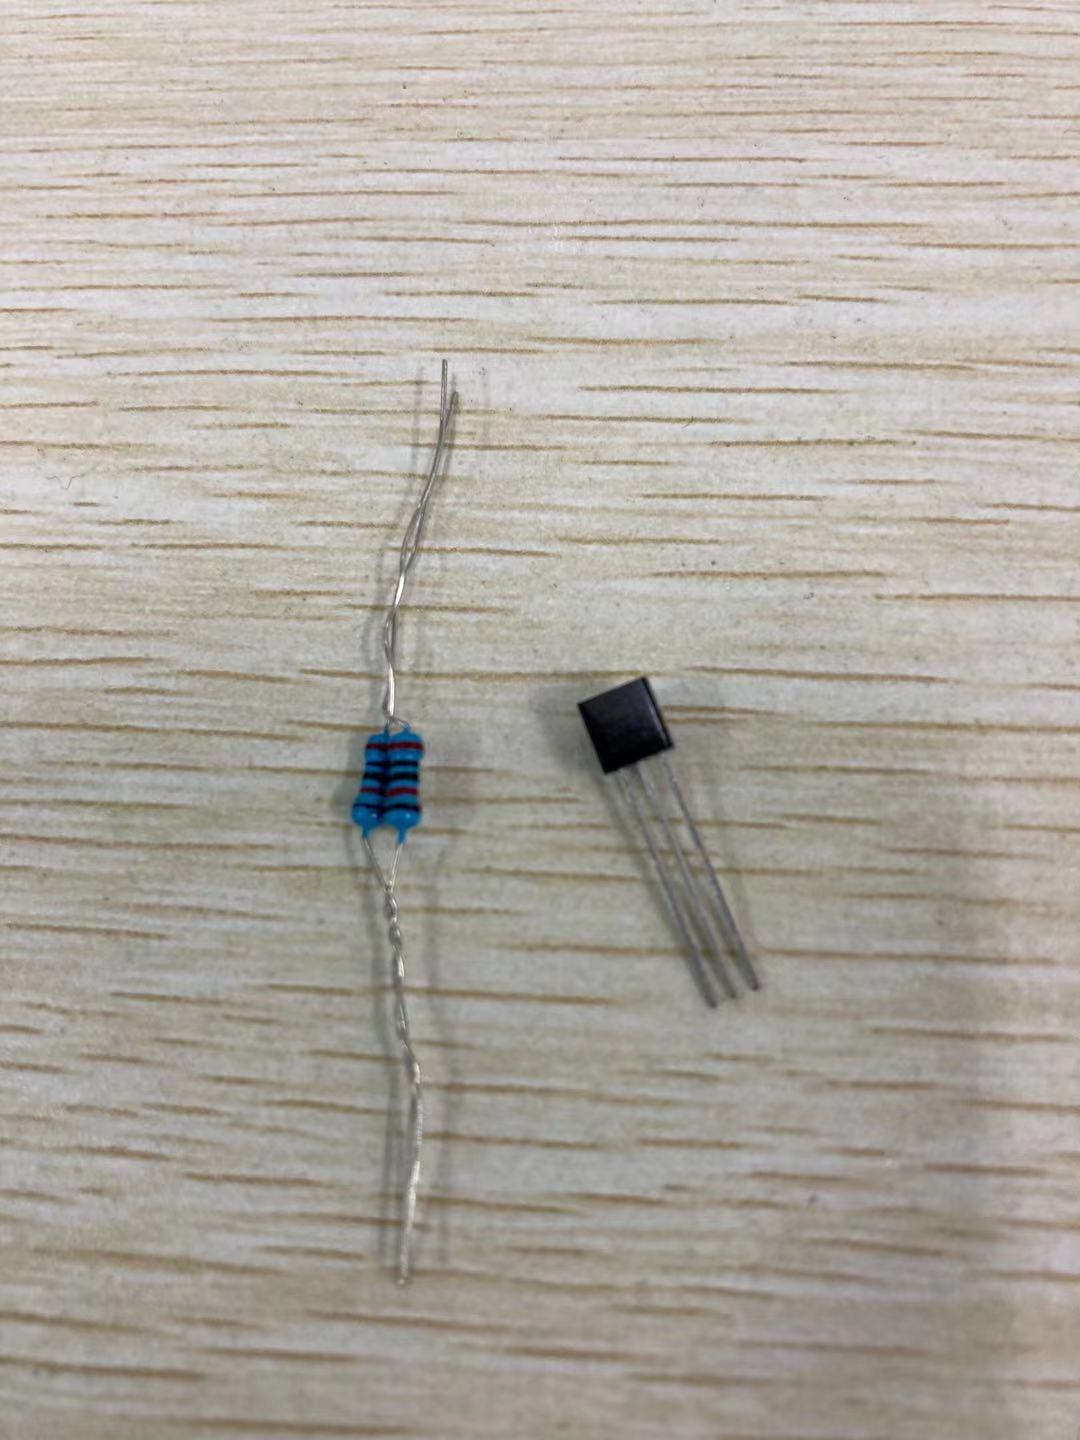
注意:DS18B20有字一面朝我们,管脚朝下,依次接入地、单片机管脚、以及5V,其中还需要接一个上拉电阻如图中的10k电阻。在图1中,关于单片机和1602液晶部分我们已经在前面文章《辉光管时钟系列<二>LCD液晶显示》中介绍过了。下面首先给出了温度芯片DS18B20的实物图,如图2所示:

下面给出简单的测试程序:
1
2
3
4
5
6
7
8
9
10
11
12
13
14
15
16
17
18
19
20
21
22
23
24
25
26
27
28
29
30
31
32
33
34
35
36
37
38
39
40
41
42
43
44
45
46
47
48
49
50
51
52
53
54
55
56
57
58
59
60
61
62
63
64
65
66
67
68
69
70
71
72
73
74
75
76
77
78
79
80
81
82
83
84
85
86
87
88
89
90
91
92
93
94
95
96
97
98
99
100
101
102
103
104
105
106
107
108
109
110
111
112
113
114
115
116
117
118
119
120
121
122
123
124
125
126
127
128
129
130
131
132
133
134
135
136
137
138
139
140
141
142
143
144
145
146
147
148
149
150
151
152
153
154
155
156
157
158
159
160
161
162
163
164
165
166
167
168
169
170
171
172
173
174
175
176
177
178
179
180
181
182
183
184
185
186
187
188
189
190
191
192
193
194
195
196
197
198
199
200
201
202
203
204
205
206
207
208
209
210
211
212
213
214
215
216
217
218
219
220
221
|
#include <reg52.h>
#include <intrins.h>
#define uint unsigned int
#define uchar unsigned char
#define _Nop() _nop_()
sbit DQ =P2^3;
#define uchar unsigned char
#define uint unsigned int
sbit lcden=P2^7;
sbit lcdrs=P2^5;
unsigned char mun_char_table[]={"0123456789abcdef"};
unsigned char temp_table[] ={" Temp: . 'C"};
unsigned char temp_high_low[]={"H: . L: . "};
void delay(uint z)
{
uint x,y;
for(x=z;x>0;x--)
for(y=110;y>0;y--);
}
void write_com(uchar com)
{
lcdrs=0;
P0=com;
delay(15);
lcden=1;
delay(15);
lcden=0;
}
void write_date(uchar dat)
{
lcdrs=1;
P0=dat;
delay(15);
lcden=1;
delay(15);
lcden=0;
}
void init()
{
uchar num;
lcden=0;
write_com(0x38);
write_com(0x0c);
write_com(0x06);
write_com(0x01);
write_com(0x80);
for(num=0;num<14;num++)
{
write_date(temp_table[num]);
delay(5);
}
write_com(0x80+0x40);
for(num=0;num<16;num++)
{
write_date(temp_high_low[num]);
delay(5);
}
}
void delay_ds(unsigned int i)
{
while(i--);
}
Init_DS18B20(void)
{
unsigned char x=0;
DQ = 1;
delay_ds(8);
DQ = 0;
delay_ds(80);
DQ = 1;
delay_ds(14);
x=DQ;
delay_ds(20);
}
ReadOneChar(void)
{
unsigned char i=0;
unsigned char dat = 0;
for (i=8;i>0;i--){
DQ = 0;
dat>>=1;
DQ = 1;
if(DQ) dat|=0x80;
delay_ds(4);
}
return(dat);
}
WriteOneChar(unsigned char dat)
{
unsigned char i=0;
for (i=8; i>0; i--){
DQ = 0;
DQ = dat&0x01;
delay_ds(5);
DQ = 1;
dat>>=1;
}
}
ReadTemperature(void)
{
unsigned char a=0;
unsigned char b=0;
unsigned int t=0;
float tt=0;
Init_DS18B20();
WriteOneChar(0xCC);
WriteOneChar(0x44);
Init_DS18B20();
WriteOneChar(0xCC);
WriteOneChar(0xBE);
a=ReadOneChar();
b=ReadOneChar();
t=b;
t<<=8;
t=t|a;
tt=t*0.0625;
t= tt*10+0.5;
return(t);
}
void delay_1ms(uchar x)
{
uchar j;
while(x--){
for(j=0;j<125;j++)
{;}
}
}
void main()
{
unsigned int i=0;
unsigned int temp_high;
unsigned int temp_low;
int num;
ReadTemperature();
init();
i=ReadTemperature();
temp_high = i;
temp_low = i;
while(1){
i=ReadTemperature();
if(temp_high<i) temp_high=i;
if(temp_low>i) temp_low=i;
write_com(0x88);
write_date(mun_char_table[i/100]);
delay(5);
write_date(mun_char_table[i%100/10]);
delay(5);
write_com(0x80+11);
write_date(mun_char_table[i%10]);
delay_1ms(10);
write_com(0x80+0x40+2);
write_date(mun_char_table[temp_high/100]);
delay(5);
write_date(mun_char_table[temp_high%100/10]);
delay(5);
write_com(0x80+0x40+5);
write_date(mun_char_table[temp_high%10]);
delay(5);
write_com(0x80+0x40+12);
write_date(mun_char_table[temp_low/100]);
delay(5);
write_date(mun_char_table[temp_low%100/10]);
delay(5);
write_com(0x80+0x40+15);
write_date(mun_char_table[temp_low%10]);
delay(5);
}
}
|
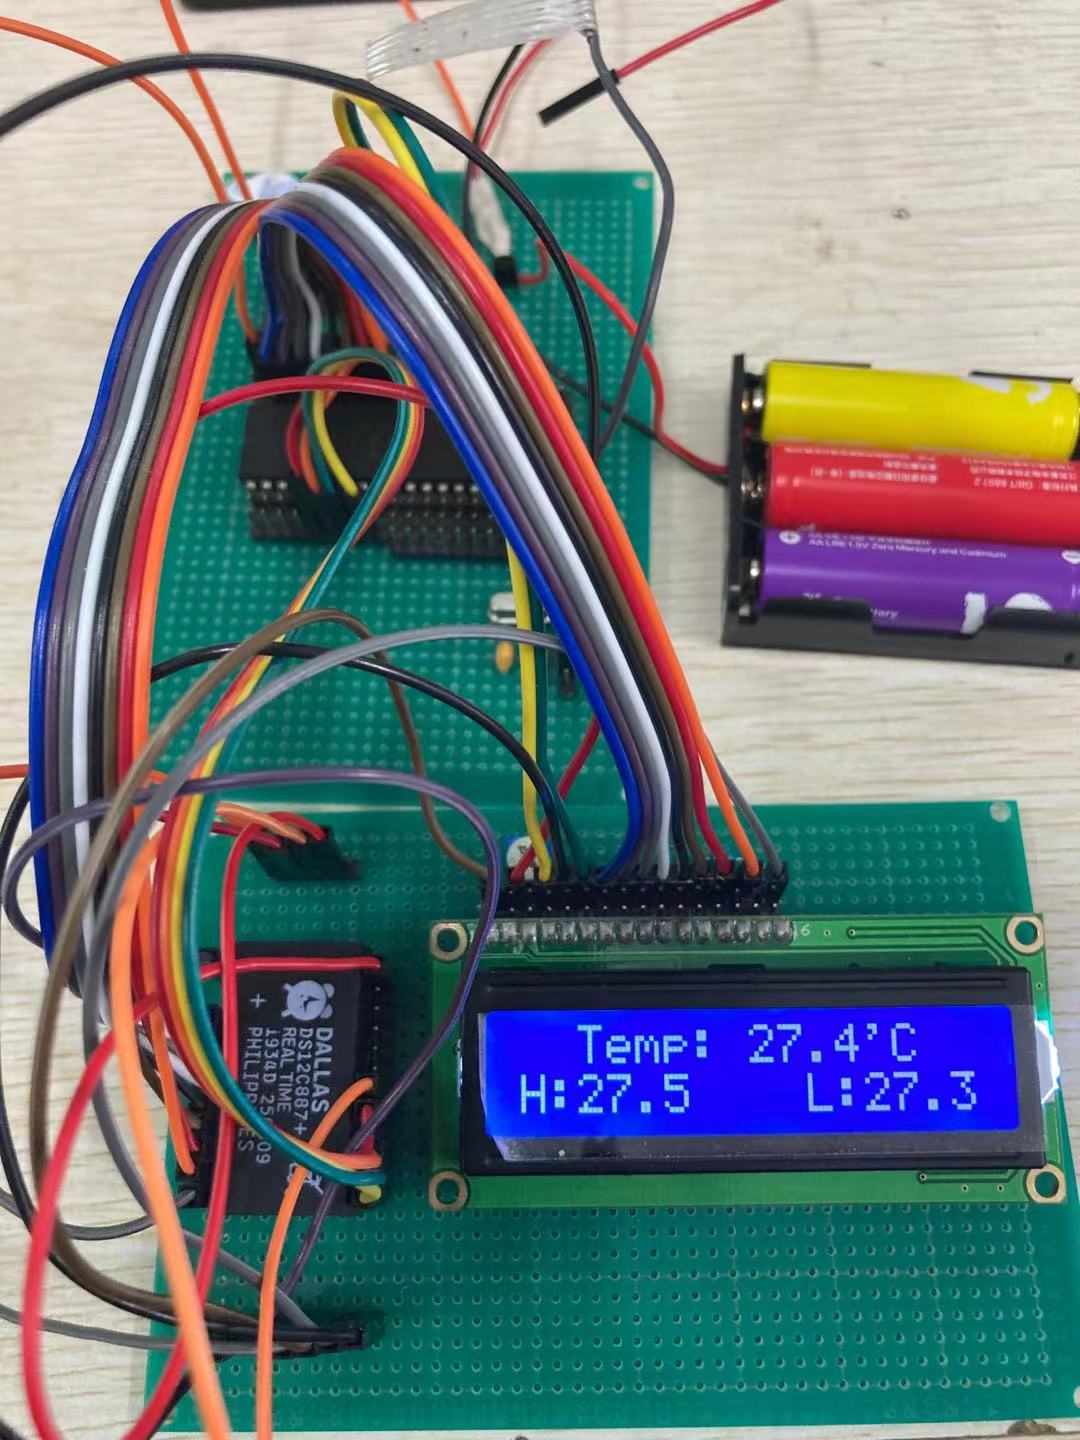
最后,给出测试结果图:


